
It's time for show and tell. I'm a weirdo.
Wednesday, December 21, 2011
Tuesday, December 13, 2011
Most ridiculous video of me singing about homophones
Please do not judge my singing ability (or lack thereof). This video is meant for the amusement of people who are annoyed by other people who cannot spell.
Also, the lyrics aren't easy to hear the whole way through because the Spice Girls are LOUD.
Here is Spice Girls Rewritten:
You wanna be smarter than a donkey, then
Proofreading does no harm; works like a charm
And if you don’t? Ha sound the alarm.
They’re all laughing at you and rolling on the ground
They’re all laughing at you and rolling on the ground
If you wanna be a smarty, you gotta learn how to spell
It’s really very easy, and it makes you look so swell
You gotta learn some homophones, and tell these words apart
Acting dumb is easy, but intelligence is an art
Also, the lyrics aren't easy to hear the whole way through because the Spice Girls are LOUD.
Here is Spice Girls Rewritten:
Oh, what do you think about that
Now you know how to spell
You say, you know your grammar and use it well
(Are you for real?)
It’s very easy, so give it a try,
But if YOU’RE really stupid, then I'll say buh-BYE
Yo I'll tell you what I want, what I really, really want
So tell me what you want, what you really, really want
I wanna, (ha) I wanna, (ha) I wanna, (ha) I wanna, (ha)
I wanna really, really, really want for you to learn how to spell
If you wanna be a smarty, you gotta learn how to spell
It’s really very easy, and it makes you look so swell
You gotta learn some homophones, and tell these words apart
Acting dumb is easy, but intelligence is an art
So, here it is real E to the Z.
You wanna get the grade, you gotta hear my tirade
We got too many guys who want to poke you in the…eyeNow you know how to spell
You say, you know your grammar and use it well
(Are you for real?)
It’s very easy, so give it a try,
But if YOU’RE really stupid, then I'll say buh-BYE
Yo I'll tell you what I want, what I really, really want
So tell me what you want, what you really, really want
I wanna, (ha) I wanna, (ha) I wanna, (ha) I wanna, (ha)
I wanna really, really, really want for you to learn how to spell
If you wanna be a smarty, you gotta learn how to spell
It’s really very easy, and it makes you look so swell
You gotta learn some homophones, and tell these words apart
Acting dumb is easy, but intelligence is an art
So, here it is real E to the Z.
You wanna get the grade, you gotta hear my tirade
You wanna be smarter than a donkey, then
Proofreading does no harm; works like a charm
And if you don’t? Ha sound the alarm.
They’re all laughing at you and rolling on the ground
They’re all laughing at you and rolling on the ground
If you wanna be a smarty, you gotta learn how to spell
It’s really very easy, and it makes you look so swell
You gotta learn some homophones, and tell these words apart
Acting dumb is easy, but intelligence is an art
Sunday, December 11, 2011
Whoooo or whoooom? (to be said like the caterpillar from Alice in Wonderland)
Well, I can assure you that the caterpillar was correct. It is, in fact, who are you, not whom are you.
Okay, so what is the difference between who and whom?
In my post about me vs. I, I briefly discussed subjects vs. objects. I = subject and me = object. In terms of who vs. whom, who = subject and whom = object.
Questions using who vs. whom:
- Who told you I pick my nose? (I don't pick it. I'm scratching an itch, thank you.)
- Who farted?
- Who farted on whom?
- Whom do you love? (Yes, Bo Diddley had it wrong.)
- Whom will Santa give big, fat, turd-sized coal to this year?
- Whom are you asking to the Sadie Hawkins dance (in his khaki pants)? (If you know that allusion, I owe you a cookie.)
- He told you I pick my nose.
- He farted.
- He farted on him.
- You love him.
- Santa will give big, fat, turd-sized coal to him this year
- You are asking him to the Sadie Hawkins dance.
Clauses using who vs. whom:
- Again, if you're talking about the subject of a clause, use who.
- Santa Claus, who brings fossilized poop to naughty children, actually loves to find out that you've been nice. (He goes not enjoy the smell of feces.)
- Ms. Wo, who acts like a total whackadoo, always finds new ways of amusing her students.
- Everyone laughs at the crazy teacher, who always leaves a lasting impression on her students.
- The pattern: In the clause, who is the subject. You could make it a sentence by replacing it with he/she.
- He brings fossilized poop.
- She acts like a total whackadoo.
- She always leaves a lasting impression.
- If you're talking about the object of a clause, use whom.
- Santa Claus, whom children fear will bring them fossilized poop, would much prefer for you to be nice, not naughty; he really does not enjoy catching wind of your stinky stocking contents.
- Ms. Wo, whom students look at with raised eyebrows, always acts like a whackadoo just to see how students will react.
- Everyone laughs at the crazy teacher, whom students never forget.
- The pattern: In the clause, whom is the object. Another noun in the clause actually functions as the subject. You could write them as sentences by replacing the whom with him/her.
- Children fear him.
- Students look at her with raised eyebrows.
- Students will never forget her.
Whom do you love for telling you about who vs. whom?
ME!
Thursday, December 8, 2011
Tuesday, December 6, 2011
Monday, November 28, 2011
The difference between me and I.
Here's the thing: when me and I are by themselves (ourselves?), people typically know which one to use. It's when one of these little buggers comes with a friend that people become quite confused. Allow me to break it down, homeskillet.
In previous posts, I've mentioned what are called the subjects and objects of sentences.
Me is always the object in a sentence. I is always the subject/doer of an action. (Man, if you read those two sentences out of context, it'd look like I sure did have me some bad grammar.)
Let's take a roll in the proverbial, asexual hay and try out me and I.
Part 1: Me (remember, it is the object in a sentence.)
TEST: Take the friend out of the equation to see if the sentence makes more sense with I or me.
In previous posts, I've mentioned what are called the subjects and objects of sentences.
- In layman's terms, a subject is what (or whom) the sentence discusses. Check it: Mary had a little prairie dog (come on, the lamb is so cliché). About whom is the sentence? Yes, grasshopper, it is MARY. After all, there's just something about that Mary, so Mary is the subject.
- The object is what receives the action of the sentence. For example, if you said, "Ow, you flicked my wenis!" In this sentence, the action word is "flicked." What was flicked? In other words, what is the object that receives this action? Who or what feels the flicking? Yes, the wenis. Therefore, wenis is the object.
Me is always the object in a sentence. I is always the subject/doer of an action. (Man, if you read those two sentences out of context, it'd look like I sure did have me some bad grammar.)
Let's take a roll in the proverbial, asexual hay and try out me and I.
Part 1: Me (remember, it is the object in a sentence.)
- Santa said to little Sally, who always eats her broccoli because her mommy says Santa brings only coal to boys and girls who do not eat their greens, "I cannot believe you sat on me and farted. You are not sugar and spice and everything nice. You are flatulence and lice and you'll pay the price. No presents for you."
- Mr. Gingerbread Man saw the rotund boy come at him with a glass of milk and a hungry sneer. He cried, "No! No! Do not eat me, dough boy!"
- I have got a lovely bunch of coconuts. Dee da la dee. There they are a standing in a row.
- Yes, I ate all of the cookies in the cookie jar. What are you going to do about it? Huh? Get at me!
TEST: Take the friend out of the equation to see if the sentence makes more sense with I or me.
- Incorrect Example: He and me played Polly Pockets until the cows came home.
- Take out "he." Me played Polly Pockets until the cows came home.
- Unless you are a caveman, then you would say, "I played Polly Pockets...."
- Therefore, put he back into the equation: He and I played Polly Pockets until the cows came home. (I really should have picked a shorter sentence.)
- Incorrect Example: Mom is taking her and I to play Dungeons and Dragons in Draco's basement.
- Take out "her." Mom is taking I to play Dungeons and Dragons in Draco's basement.
- Perhaps you have been indulging in D&D a little too long and your brain is a bit charred. Well, douse your neurons with a some water and take note.
- The correct sentence would read Mom is taking her and me to play D&D in Draco's basement. (Note: In this situation, many people would substitute "her and me" for "us.")
- Remember our earlier lesson about subjects and objects? Well, here's the break down:
- He, she, they, and we are all subjects.
- He pooped.
- She pooped.
- They pooped. (Hopefully not in the same room)
- We pooped. (We kept our eyes closed.)
- Him, her, them, and us are all objects.
- He poked him.
- He poked her. (I read this post to my husband, and he argued that saying "he" poked her sounds sexual, which automatically makes the sentence much funnier. Thus, we have "He poked her" instead of "She poked her.")
- They poked them.
- They poked us. (Saying we poked us sounds much too much like self pleasure, and it's just weird.)
Wednesday, November 9, 2011
When I read it, I breathed, so I must need a comma.
Though this rule sometimes applies, a lot of people are long winded while others are quick winded (totally made up that term), so the poor comma might feel either neglected or abused. Neither option is very fair to the sweet, helpful, wonderful comma.
Let's talk aboutall many of the places (truly, too many to cover in one post) we use the versatile comma.
Place #1: Include commas after introductory words or phrases (sentence parts which cannot stand alone because they miss a subject/verb combination).
Place #2: Include commas after a subordinate clause only if the subordinate clause comes at the beginning of the sentence. People frequently break this rule, so pay close attention.
Place #4: Between multiple adjectives describing the same noun (if you're not using the conjunction and).

Place #7: Place commas before, around, after elements of the sentence (clauses, phrases, words) that you could live without
I realize that this post may have generated even more questions in your curious, eager mind. If you need a separate post on any of the grammatical terms, please let me know in the comments section.
NOTE: I try to avoid using really complicated, "Englishy" terms. I'm figuring that many of my readers fall into one of two groups: one, English teachers who want to show their brainless (I mean GENIUS) students how to stop abusing the comma, and two, people who aren't entirely comfortable with grammatical terms.
Let's talk about
Place #1: Include commas after introductory words or phrases (sentence parts which cannot stand alone because they miss a subject/verb combination).
- Introductory word: Unfortunately, you smell like feet.
- Introductory phrase: With a look of regret on her face, my dog cowered in the corner after she urinated all over the rug.
- Introductory phrase #2: Just for the record, cleaning up a trail of urine is worse than cleaning up a puddle of pee.
Place #2: Include commas after a subordinate clause only if the subordinate clause comes at the beginning of the sentence. People frequently break this rule, so pay close attention.
- Correct: After they randomly planked on their desks, my brilliant students decided it was time to start their vocabulary tests.
- Incorrect: My brilliant students decided it was time to start their vocabulary tests, after they randomly planked on their desks. (Again, you do not actually want that red comma.)
- NOTE: If the part of the sentence which cannot stand alone (subordinate clause) comes FIRST, you need a comma. If it comes at the end of a sentence, you do NOT need a comma.
- Correct: Kevin had a 7% in my class, so he began fabricating stories to explain why he didn't have assignments. Apparently, he thought I was stupid enough to believe that rapscallions attacked a bagel shop, and he needed to use his vocabulary flashcards as throwing stars.
- Why is it correct? In the correct sentence, what comes before the red font is a complete sentence (Kevin had a 7% in my class); what comes after the red font is also a complete sentence (he began fabricating stories...). Therefore, you need to invite our friend, the comma, to the party. The comma goes before the conjunction.
- NOTE: Some misguided souls place the comma after the conjunction. YO! The comma is supremely awesome, so it goes before the conjunction.
- Incorrect: Kevin ate too many beans
, andstunk his classmates out of the computer lab. - Why is it incorrect? What comes before the blue font is a complete sentence, but what comes after the blue font is NOT a complete sentence. It's just one sentence. What do I mean? I mean, this sentence has one subject (Kevin) and two verbs (ate and stunk) to go with that one subject. Because you cannot split the sentence into two sentences, you do not want a comma before and.
- Moral of the story? If you can make two complete sentences with what comes before the conjunction and what comes after the conjunction, then put a comma before the conjunction. If you cannot make two complete sentences, because you're missing a second subject, then you do not need the comma. (Hey, commas need naps just like we do.)
Place #4: Between multiple adjectives describing the same noun (if you're not using the conjunction and).
- Correct: You, my swaggerific, dirty friend, are my hero.
- Why is it correct? Lists need commas. I provided a (short) list of adjectives for my friend, so I needed to separate that small list with a comma. Yes, you can add a third adjective: You, my swaggerific, dirty, bombastic friend, are my hero.
- Incorrect: You are swaggerific (new teenage colloquialism)
, anddirty (apparently a new teenage way of actually complimenting someone/something). - Why is it incorrect? You used and in between the two adjectives, so no adjective is necessary.
- Incorrect: My wacky, English teacher writes funny sentences.
- Why is it incorrect? Technically, wacky and English serve as adjectives; however, let's look at two things. One, replace the comma with and. Does it make sense? "My wacky and English teacher writes funny sentences." Unless you're saying she's English (from England), that pairing makes no sense. Two, could you flip flop the adjectives and make a logical sentence? "My English and wacky teacher writes funny sentences." Umm...no. So, try these two tests to determine if your "list" of adjectives actually goes together and needs a comma.
- Richard, who's your favorite Little Rascal? Is it Alfalfa, or is it Spanky? Sinner.
- Stop looking at me, Swan.
- Note: If these sentences sound familiar to you, then you're awesome because you've obviously watched Tommyboy (example #1) and Billy Madison (example #2).
- Example: As a teacher, I've learned many new things: how to jerk, what "coning" is, who makes the best YouTube videos, and where to go online if I want to rot my brain.
- Please note: Some people do not place a final comma before the word and. I hate these people. Okay, not really, but I want to shove a hot poker into their eye socket. Okay, not really, but it grinds my gears. See the following visual for what you need to know about the Oxford comma.

Place #7: Place commas before, around, after elements of the sentence (clauses, phrases, words) that you could live without
- Correct: You use semicolons really well. I am, however, unimpressed by your use of commas.
- Why is it correct? You don't need however. It's just a transitional word, so place commas around it. In circumstances such as this one, consider the commas like little midget, chopped-in-half versions of a set of parentheses.
- I am not writing an incorrect sentence. I have been writing this post (on and off) for about a week. If I have to spend one more minute on this section of the post, I will scoop out my eyes with a melon baller. Deal.
I realize that this post may have generated even more questions in your curious, eager mind. If you need a separate post on any of the grammatical terms, please let me know in the comments section.
NOTE: I try to avoid using really complicated, "Englishy" terms. I'm figuring that many of my readers fall into one of two groups: one, English teachers who want to show their brainless (I mean GENIUS) students how to stop abusing the comma, and two, people who aren't entirely comfortable with grammatical terms.
Friday, November 4, 2011
Why I Avoid Gluten
I realize that many of my posts discuss or will discuss gluten-free foods, so it might be helpful for people out there to understand how I came to be gluten-free.
In High School, I suffered from a lot of health problems, which followed me into college. My list of ailments spanned the spectrum: sinus infections, severe stomach cramping, the not-so-nice stuff coming out of the bottom end, and I seemed to catch just about anything that so much as sniffed in my direction. Doctors ran countless tests, but they never gave me answers. It all came to a head when a doctor gave me a "prescription" to see a psychiatrist; they thought my sicknesses were self-induced or manifestations of hypochondria. I was livid that their incompetency and inability to find answers was somehow my "mind's" fault. I must have been imagining things if they couldn't find anything wrong. At that moment, I extended my figurative middle finger to the medical profession.
Unfortunately, I had to keep seeing doctors. Again and again and again. (As a relevant side note, let me just say how much I hate the doctor's office. I find absolutely no pleasure in visiting a giant petri dish, yet doctors thought my psyche invented my pain out of some subconscious desire to spend time with them. Right.) Eventually, my digestive system became so sensitive that eating plain rice gave me severe heart burn. I felt bloated, heavy, lethargic, and nauseated every time I ate. In fact, I looked puffy. Nothing agreed with me. I dreaded going out to eat with friends. I avoided going anywhere far from a bathroom. My digestive system was controlling my life. One day, I ended up in a public bathroom at my college, crippled by the most intense abdominal pain I had felt, and I had felt a lot of abdominal pain.
I did what any smart college kid would do: I called mommy. The 45 minute commute to my college took my mom less than 30 minutes. When she arrived, she helped me into her car and drove me over to the ER, a very quick trek from the college. The doctors ran tests. Boom. An answer fell from the sky: gallstones. The doctors were curious, "What? How can this be? You're young, thin, and really in shape. Gallstones happen to people who are older or over weight. Not you." What factor had all of my doctors neglected to consider? BOTH of my parents had their gallbladders removed; in fact, my mom's went bad while she was pregnant with me, but she had to wait until I was born before she could have her gallbladder removed. Guess what? Gallbladder problems are hereditary. Thank you, doctors, for not considering my family history, a pretty important component in treating a patient.
I asked, "What do I do?" Do you want to know what the doctor should have said or what the doctor actually said?
Well, I'll tell you what he actually said, which will forever remain imprinted on my memory: "Don't worry about it right now. Wait until you're on your honeymoon and hovered over the toilet in excruciating pain, then you should have it removed." Sound medical advice.
I sought a second opinion from a surgeon. Within two weeks, I was having an organ removed. After the operation, my surgeon said, "Your gall bladder was so infected and inflamed that it took us 30 minutes more to complete the procedure." Apparently, I was really sick. Go figure. I probably should have seen that psychiatrist, just to deal with the emotional turmoil my doctors made me endure.
After I recovered from the surgery, I was feeling much better. Then, within two years, I needed an appendectomy. The bloating, fatigue, and lethargy was back.
It was time to rely a little less on the medical profession and a little more on my intuition. I started researching how my diet could be affecting my health. At the time, gluten-free was a shadow past the horizon, yet I found the research. All of the symptoms associated with gluten intolerance were my symptoms. I decided to remove gluten from my diet. Presto. The bloating and heaviness went away. My sinus problems abated.
Four years later, I'm learning a lot about the gluten-free lifestyle and making sure not to lose important nutrients by going gluten-free. A lot of our gluten-free products are missing soluble fiber and other beneficial attributes, so you have to be sure to find ways of including these things into your diet.
On a final note, I must add that going gluten-free is not the only step in this long process for me. I need to reduce my sugar intake (a serious battle for a sweet-a-holic like me) and increase my water intake (a serious battle for an on-the-go teacher who has to schedule times to pee.) Here are the lessons I've learned:
- Appreciate doctors for their medical degrees and expertise, but remember that, although they know the human body very well because of their years of study, they do not know your body as well as you do. Listen to your gut (sometimes quite literally), and seek as many opinions as you need to until you find a doctor who understands and believes in you.
- Whoever said "you are what you eat" is right. Diet has everything to do with how you feel. If you eat sludge, then you feel like sludge.
- Do not allow anyone to make you feel like less of a person, for any reason.
- You can live without a lot of your organs, or at least without part of each one. It's amazing how the body regenerates...in a creepy sort of way.
Gluten Free to be Me
A little birdie suggested I post about good gluten-free recipe books, so this post came to be. I pull recipes from a plethora of places. I'll tell you some of my favorite places to consult.
First, I frequent this awesome organic grocery store, Roots, which is part of what's called The Conscious Corner. This corner of businesses includes an awesome restaurant (Great Sage), an eco-friendly cards/kids' toys/some clothing/lunch bag store (The Nest), an all-natural pet product store (Bark), and Roots :).

Anyway, I always buy this same magazine from Roots; it's called Living Without. I always tear out all of the recipe pages in this magazine, and I recently stumbled across its website. No, it's not cheap, but you can print the recipe of the day from their site.
Since we're hosting Thanksgiving at our house this year, I will clearly invest in the upcoming November issue. I bought the October one, too.

Second, one of my awesome wedding guests, Carol, bought me The Gluten-Free Bible. I love fixing the recipes from this cookbook. (I found the focaccia bread recipe here.) Tonight, I made the Mediterranean vegetable bake dish, which smelled and tasted wonderful. We fixed it with Chicken Cordon Bleu. Yum. Here's a picture of the dish before we put it in the oven.
If you're looking for The Gluten-Free Bible, you can find it here.
It looks like this:
 Now, the next cookbook is filled with gluten-free recipes; however, it's easy to accommodate all of the recipes.
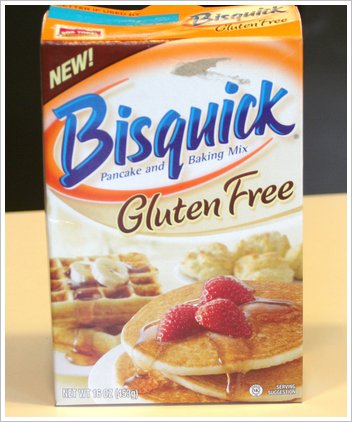
Well, in case you're otherwise unaware, Bisquick now makes a gluten-free mix! (Betty Crocker has a few cake mixes, and they're all located in the "normal" food aisles, haha.) I made the strawberry shortcakes, which the middle picture features; Jeff won't stop talking about them. Some commercial for Bisquick came on the TV today; the strawberry shortcake made an appearance. Jeff peered at me with a pained look and said, "Mmmm so good. When will you fix them again?"
Honestly, my best recommendation is to figure out your favorite dishes which usually contain gluten (apple pie, red velvet cake, pizza, sandwich bread, etc.) and search for recipes on Google. I've found many recipes this way.
If you'd like for me to post about good store bought breads, pizza crusts, frozen meals, french fries, dessert, and etc., post a comment in the box below! Trust me when I say that trying out gluten-free foods is expensive and frustrating. I wish someone else had saved me the money and time by telling me which products taste like cardboard and which ones taste pretty darn good.
I'd be glad to save you some time and money!
First, I frequent this awesome organic grocery store, Roots, which is part of what's called The Conscious Corner. This corner of businesses includes an awesome restaurant (Great Sage), an eco-friendly cards/kids' toys/some clothing/lunch bag store (The Nest), an all-natural pet product store (Bark), and Roots :).
Anyway, I always buy this same magazine from Roots; it's called Living Without. I always tear out all of the recipe pages in this magazine, and I recently stumbled across its website. No, it's not cheap, but you can print the recipe of the day from their site.
Since we're hosting Thanksgiving at our house this year, I will clearly invest in the upcoming November issue. I bought the October one, too.
Second, one of my awesome wedding guests, Carol, bought me The Gluten-Free Bible. I love fixing the recipes from this cookbook. (I found the focaccia bread recipe here.) Tonight, I made the Mediterranean vegetable bake dish, which smelled and tasted wonderful. We fixed it with Chicken Cordon Bleu. Yum. Here's a picture of the dish before we put it in the oven.
 |
| (Let me know if you'd like the recipe!) |
If you're looking for The Gluten-Free Bible, you can find it here.
It looks like this:
 | |||||
| Confused? |
 | |||
| I've made pancakes with the mix. They're also delicious. |
If you'd like for me to post about good store bought breads, pizza crusts, frozen meals, french fries, dessert, and etc., post a comment in the box below! Trust me when I say that trying out gluten-free foods is expensive and frustrating. I wish someone else had saved me the money and time by telling me which products taste like cardboard and which ones taste pretty darn good.
I'd be glad to save you some time and money!
Thursday, November 3, 2011
If you read this post, thEn you might not look dumber thAn a 5th grader.
Sit down for a moment. We need to have a talk. I've been reading what you write, and I have some bad news for you: you look like a wooly mammoth beating his head with a sock full of rocks because you are confusing the homophones then and than. Rookie mistake.
Then, with an E, indicates time.
Since all good monkeys need to see before they do, let us look at a few examples.
Which one is it?
And the survey says?
Then, with an E, indicates time.
Since all good monkeys need to see before they do, let us look at a few examples.
- The if-then statement: "They" say that if you pick your nose, THEN you will build up immunities. If you eat the booger, THEN you might become superhuman. (Really, I don't recommend this practice. Even if you pick a winner, you're sure to look like a loser.)
 |
| Nom nom nom. (Sorry, no political malice here. He left himself wide open for this one.) |
- First, he farted in my general direction, THEN he tossed an air biscuit at me. How rude!
- She was wrinklier, but not cuter, THAN a Shar pei.
 |
| Dis mah sad face. You dumb. Know than. |
- Our new rug was thicker THAN an Armenian's chest hair.
Which one is it?
- She tidied up the house, then/than she hid bodies in the basement.
- If she could have afforded braces, then/than I wouldn't have called her snaggle tooth.
- He was angrier then/than a 10-foot troll trying to scratch its back with a baby fork.
- No one bakes apple pies better then/than my mom does.
And the survey says?
- Then
- Then
- Than
- Than
 |
| I sure hope so. |
Sunday, October 30, 2011
Olive & Feta Cheese Focaccia
 |
| Please do not mind the ugliness of the baking sheet I laid the foil on top of before I transferred them to a pizza stone. It's a very old hand-me-down. |
Okay, part of the recipe calls for flour (obviously). You can either use the following flour-blend recipe, or you can buy a box of pre-made gluten-free flour blend. However, you get more for your money this way.
Gluten-free flour blend (can be doubled, tripled, whatever you want):
- 1 cup brown rice flour
- 1 cup sorghum flour
- 3/4 cup millet flour (can substitute with chickpea flour)
- 1 cup tapioca flour
- 1 cup cornstarch
- 1/3 cup instant, unflavored mashed potato flakes (I didn't have any, so I used 1/3 cup almond flour instead)
Store it in an airtight container.
The following recipe is adapted from The Gluten-Free Bible.
Ingredients (for bread/dough):
- 3 cups Gluten-Free Flour Blend
- 2 packages (1/4 ounce each) active dry yeast
- 2 teaspoons xanthan gum
- 1 teaspoon salt
- 1 1/4 cups warm water
- 1/4 cup extra virgin olive oil
- 3 egg whites, at room temperature
- 1 tablespoon agave nectar
- 1 teaspoon cider vinegar
- 1/2 cup chopped pitted kalamata olives
- 1/2 cup chopped pitted castelvetrano olives (whole green)
- 2 tablespoons chopped fresh rosemary leaves (recipe calls for 3, but that ends up being a LOT)
- 2 tablespoons thyme
- 3 cloves garlic, minced
- 1/4 cup extra virgin olive oil
- coarsely ground black pepper
- 1/4 cup feta cheese
- Recipe says fresh rosemary and thyme; I had them only in canisters, but it seemed to make no difference.
- Recipe calls for Romano cheese; I had none, so I used feta cheese. I loved the flavor the feta contributed.
- Don't add any extra salt with toppings. Trust me. The olives and feta cheese are already pretty salty. Adding more salt is even too much for someone who's a salt-a-holic like me.
- Combine flour blend, yeast, xanthan gum, and salt in large mixing bowl. In a separate medium bowl, whisk together 1 cup warm water, oil, egg whites, honey, and vinegar. Add wet ingredients to dry ingredients with your electric mixer. Mix at a low to medium speed. You'll need to scrape the bottom and sides periodically to ensure all of the dry ingredients are mixing. Batter should be smooth, shiny, and thick. The recipe doesn't give this information, but gluten-free batters are almost always super sticky. Don't be alarmed; it's perfectly normal even if it is messy and mildly frustrating.
- Preheat oven to 450 degrees F. Line large baking sheet with foil/parchment paper. (I just put a two-foot piece of foil on the counter, sprayed it with some PAM, divided the dough into two pieces, and put the pieces of dough on the foil. You want to end up with two flattened dough pieces, 8-inch round and 1/2 inch thick. NOTE: You might want to use gloves if you dislike getting really sticky dough all over your fingers.
- Let the dough rest for 20-25 minutes. Dimple top of dough with fingertips (because the mixture is stickier than they want you to believe, my dimples looked a little more like odd craters; I achieved the same result, so whatever.)
- Mix the toppings together in a small bowl to ensure even distribution.
- Drizzle oil over the dough. Sprinkle with pepper.
- Sprinkle dough with the toppings. Drizzle oil over top of everything.
- Bake for 15 minutes (I didn't use a baking sheet; I used a pizza stone.) or until lightly browned on the top AND bottom.
- Sprinkle with cheese. Cool for 3-5 minutes on a wire rack before you cut the pieces.
- Enjoy :)
 |
| This recipe would make for a great Thanksgiving appetizer! Just cut up the two focaccia breads into smaller, bite-sized pieces and serve them on appetizer plates or a pretty tray. |
By the way, Jeff is quite the picky one, who usually responds to my creations with "yeah, it's pretty good," and then he proceeds to eat two helpings and all of the leftovers. This time, however, his eyes lit up with the first bite, and he said (between munching noises), "MMM, this is reeeally good." There were no leftovers on his plate. Success.
Thursday, October 27, 2011
Reorganizing
So, I am not entirely fond of cleaning, but I do LOVE to organize. I find it endlessly therapeutic.
Let's start with my office.

 Yeah, yeah, yeah, I know that none of my furniture is made of the same wood. Whatever! I have no shame. Maybe one day I'll find the time to sand it all down and paint it one color; of course, that would be pretty boring.
Anyway, the tall shelf on the right is my "need to read" bookshelf; I organized all of the books by author's last name.
The tiny desk in the middle is my "wedding project" desk. It houses all of the materials I need to work on the wedding scrapbooks I am making for my mom, mom-in-law, and two aunts. Also, if anyone ever needs a workspace in my house (say, a niece or nephew), that little desk will do just fine. Honestly, people are lining up to work in my office. True story.
That photograph in the middle of the wall? A previous student of mine took that photo, blew it up, and framed it for me. It inspired the green accent wall.
 The curtains? Pier 1...on sale.
The little shelf to the left of my filing cabinet? It houses all kinds of paper.
The drawers to the right of the filing cabinet? They house stickers, project ideas, cards/letters to save, and other nondescript items.
Like my teacher blanket? I've had it since elementary school!
Okay, see the shelves on the wall? I like what I did with these. The top shelf holds all of the books that I've read as well as useful anthologies from college. The bottom shelf holds all of the novels/plays that I teach during the school year. Since I know the books on these shelves pretty well, I don't need them as close to my desk.


As far as I'm concerned, problem = solved.
I hope you enjoyed basking in the glory of my office and cabinet tops.
Let's start with my office.

I considered buying chalkboard paint and painting a square of it on my office wall, but that option seemed too costly and time consuming. Instead, I found this awesome item at Learning How.
It's adhesive chalkboard material! It came in purple and blue. Blue matched my office better, so I went with it. I didn't want the edges to look awkward, so I bought cute, paisley borders to outline the edges of my sticky chalkboard. Genius, I know.
You can find some of these adhesive chalkboard squares on Amazon; just click the link :)

Anyway, the tall shelf on the right is my "need to read" bookshelf; I organized all of the books by author's last name.
The tiny desk in the middle is my "wedding project" desk. It houses all of the materials I need to work on the wedding scrapbooks I am making for my mom, mom-in-law, and two aunts. Also, if anyone ever needs a workspace in my house (say, a niece or nephew), that little desk will do just fine. Honestly, people are lining up to work in my office. True story.
That photograph in the middle of the wall? A previous student of mine took that photo, blew it up, and framed it for me. It inspired the green accent wall.

The little shelf to the left of my filing cabinet? It houses all kinds of paper.
The drawers to the right of the filing cabinet? They house stickers, project ideas, cards/letters to save, and other nondescript items.
Like my teacher blanket? I've had it since elementary school!
Okay, see the shelves on the wall? I like what I did with these. The top shelf holds all of the books that I've read as well as useful anthologies from college. The bottom shelf holds all of the novels/plays that I teach during the school year. Since I know the books on these shelves pretty well, I don't need them as close to my desk.

And now for my favorite part: my desk nook. I place the desk here for a few reasons. One, it's under a set of easily accessible shelves. Two, it's not blocking the window. Three, it has the perfect view of the hallway, where people usually linger to talk to me. When I say people, I really mean Jeff and the dogs.
Anyway, the shelves above my desk have a very specific method of organization. On the top shelf, I placed all of the teacher reference books and children's books that I don't need very often. On the middle shelf, I placed teacher reference books for reading (some poem anthologies/reading strategies books/etc.). Finally, the bottom shelf houses all of the teacher reference books about writing; I use these books the most often, so they're the closest to my workspace. Admittedly, I'm lazy once I sit in that office chair. I don't want to get up and down a million times just to grab a book. So, I made everything that I use the most as easily accessible as I could. Mission accomplished.

I can hear you now: "Danielle, you're posting about organizing, yet you're throwing a random picture of your kitchen, not your office, onto this blog post? What's wrong with you?" The answer is simple: I completed both of these projects in the same day, so they deserve to fall into the same post. Yes? Yes.
Anyway, so what does this picture have to do with organizing? WELL, I'm glad you asked.
Problem #1: I hate knick-knacks. They take up space that something useful could be filling. When I say knick-knacks, I mean little figurines and such. You know what I mean, right? Those little angels, or those little chickens, or those little boots? What does that mean, you wonder? I didn't want trinkets on the top of my cabinets. I wanted purposeful items to fill an empty space. Let's be honest. What else am I going to do with the top of my cabinets? Nada.
Problem #2: We have very few places, other than the walls, to hang wedding pictures.
Solution? Print out some of my favorite wedding pictures and give them a home above the cabinets.
You might tell me that I need to dust the picture frames, but wouldn't I need to dust that area anyway?
As far as I'm concerned, problem = solved.
I hope you enjoyed basking in the glory of my office and cabinet tops.
Monday, October 24, 2011
Keeping Out Creepers
So, several months ago, Jeff had to take the night shift at his job. Naturally, based on my unnatural fear of being alone at night, I panicked. Our kitchen has a window above the sink, and this window had no covering, which means I'd worry about what was staring in at me from the pitch dark as I fixed my breakfast at 5:30 in the morning. I kept telling Jeff that I wanted curtains or blinds or ANYthing to block out the creepers' peepers. I'm aware that no one was staring at me, but I've watched one too many episodes of Criminal Minds not to be worried about the possibility.
You see, the only reason it took so long was that our kitchen window has one of those funky lengths that they make only valances for. And, as we all know, valances do not cover the length of any window; otherwise, they really wouldn't be valances. I was left with either finding the right size blinds (not too lucky in that department) or making my own. I had to make my own.
"Why is that a problem?" you ask. Well, I own no sewing machine. I did what any intelligent individual would do and I consulted Google for the answer: no-sew curtains. As with my gluten-free red velvet cupcake recipe, I found no instruction sheet I liked by itself, so I combined the "easier" elements of two. (I believe one was on HGTV's site.)
VERY IMPORTANT NOTE: If you plan to make no-sew curtains, please do not use no-sew glue. It's crap in a bottle and not even adhesive crap. Go with the strips of hem tape. Otherwise, your no-sew curtains will turn into hand-sewn curtains if you have no sewing machine like yours truly.
Anyway, I bought fabric that I liked. You can cut up an inexpensive table cloth from Marshall's/Home Goods/wherever, but I found fabric that I really wanted at JoAnn's. Here's how I'd do it with the hem TAPE (not the stupid, craptastic glue).
Materials:
 |
| See what I mean? Creepy. |
"Why is that a problem?" you ask. Well, I own no sewing machine. I did what any intelligent individual would do and I consulted Google for the answer: no-sew curtains. As with my gluten-free red velvet cupcake recipe, I found no instruction sheet I liked by itself, so I combined the "easier" elements of two. (I believe one was on HGTV's site.)
VERY IMPORTANT NOTE: If you plan to make no-sew curtains, please do not use no-sew glue. It's crap in a bottle and not even adhesive crap. Go with the strips of hem tape. Otherwise, your no-sew curtains will turn into hand-sewn curtains if you have no sewing machine like yours truly.
Anyway, I bought fabric that I liked. You can cut up an inexpensive table cloth from Marshall's/Home Goods/wherever, but I found fabric that I really wanted at JoAnn's. Here's how I'd do it with the hem TAPE (not the stupid, craptastic glue).
Materials:
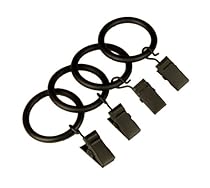 |
| Meet the curtain rings with clips. |
- Curtain rings with clips
- Hem tape (can be found in craft stores or craft sections)
- Iron
- Scissors
- Needle & thread (just in case)
- Curtain rod (obviously)
- measuring tape
- Jeff installed the curtain rod because he's tall, and that's what guys like to do.
- I measured the window (taking into account that I'd need to measure from wherever the curtains would start, which wasn't necessarily at the top of the opening)
- I measured one side of the fabric and cleaned up the ends by sewing them under (after having failed miserably at trying to use the no-sew glue). At this point, YOU, the smart person that you are, would be attaching the hem tape, sticky side down, to the back of the curtain and ironing the hem in place.
- Once I made one curtain, I measured out the other side, leaving enough room to tuck under and sew (again, you'd be ironing the sticky hem tape and saving yourself time) so that this side was exactly as big as the other side. I feared that I'd make both sides at once and one side would be smaller than the other, so I used the first one as a template for the second one.
- Once all of your untidy hems are neatly sewn (ahem, ironed in place), attach the rings with clips to the top of your curtains and hang them on your curtain rod. Tada!
 |
| I know that creepers can still be outside of my window, but if I can't see them, then they don't exist. |
Sunday, October 23, 2011
Clipless Curling Iron
So, I love to experiment with my hair. Many people have complimented certain styles that I wear, so let me show you two videos that helped me.
I figured out the clipless curling iron on my own, but here's a great video that helps you achieve the look you want.
Okay, when I have no time to do my hair in the morning, and I'm not feeling the curly style, this is my go-to 'do. Everyone always loves it. My co-teacher calls it my YouTube hair because I always tell people, "I learned how to do it on YouTube."
Remember that YouTube is not just a site to visit for music videos. You can learn how to do all sorts of things from instructional videos on this site. Thanks to YouTube, my husband learned how to tie a double windsor knot (for his tie), tie a bow tie, and a ridiculous number of other things. I typically use it for hair tutorials.
Oh, I have no pictures of me sporting my YouTube hair, but I do have a picture of my hair after I used the clipless curling iron on it.

(P.S. That awesome quilt behind me was made by one of my talented friends, Carol.)
I bought my clipless iron at Target for $24.99. Here is the link to it on Target's site:
(NOTE: It comes with a glove, and you NEED it; otherwise, you'll burn the dickens out of your hand. Trust me.)
Subscribe to:
Posts (Atom)


.jpg)
